Thursday, 20 January 2011

Construction of Film: Adobe Premiere Pro

To edit my film I used Adobe Premiere Pro to create the main body, this consisted of a lot of use of the vast array of tools available in the software.


Here I have used the cross dissolve transition in Adobe Premier Pro, for a prolonged period of time, the transition is simply put into use by dragging and dropping to the desired area, and here I used it to create a montage scene, to portray a longer period of time than the timing in the video allowed me.


Here is an example of the amount of layers of film I used in Premiere Pro to edit with, using this number of layers allowed me to quickly realize which take of a shot would work best, and also allowed me to cut tightly to the end of the last clip.


Here is the audio timeline, before I had layed down any footage, as you can see Premiere Pro gives a clear visual representation of the audio track and where different parts of the song come in and out.


Here I used a transition called additive dissolve, which is basically a brighter version of cross dissolve, offering a bright glare as it transcends.


Here I played around with effects, to see just what I could do with the program, I did not use this effect however, but figuring out what was possible in the program was a crucial part of the construction ofmy video


Here, again I played around with effects, however did not use this one either.


Here is an example of me rendering my file. It was important for me to do this frequently as otherwise the program ran slowly and had trouble matching visuals to audio.


Here you can see me playing around with the speed of footage, speeding this shot up slightly so that it would fit in better with the beat of the song.


Using the cross dissolve transition some more...


Here I used the luma key tool to give the image a much darker and dirtier feeling to what I was able to do in real life, I feel that this worked well and was crucial to maintaining the look I wanted for my video.


Here you can see another example of me using the layers of video to my advantage, allowing me to find and maintain the right placing for my footage.


Here, at the end of my video I am using the fade to black transition to give the ending of the film a sense of closure.


Here are the main tools used in Adobe Premiere Pro, the select, grab and cut tools being the only ones that I really used. The cut tool is used to cut footage wherever wanted, slicing files in two at the desired point. The select tool is used to select this footage before, and the grab tool is used to move footage around via the use of drag and drop.

Wednesday, 19 January 2011

Original Photos for my Digipak

As part of the construction of my Digipak I took a series of photos using the two main participants of my video as models, I took around 100+ photos in total, below are some examples of the ones I have selected to most likely be used in my final product. When shooting I purposefully took shots in close up and offset so that the image wasn't particularly obvious or typical of shots that are usually seen of the same kind.


Sunday, 16 January 2011

Influences on my Digipak

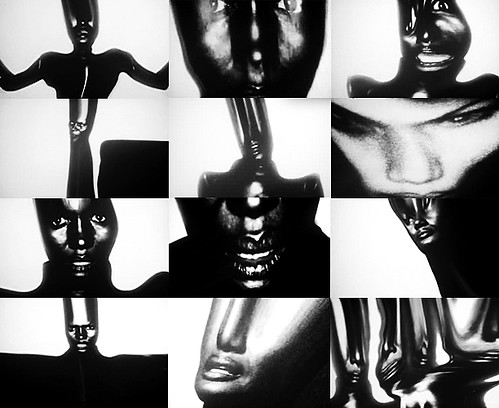
I feel that all of the examples listed below all show aspects that I would like to mirror in the creation of my digipak and magazine advertisement, most of them for the extreme close ups that have been used, offset or cut off photos and punk imagery. All of them have give off an air of some darkness and a foreboding feeling, which I would like to do when creating my digipak also.

Bloc Party - Intimacy Album Cover and Variant Covers


Bloc Party - Talons Single Cover


Madonna - American Life Album Cover


The Strokes - Is This It Album Cover


She Wants Revenge - She Wants Revenge Album Cover


Grace Jones - Corporate Cannibal Video and Single Cover


Monday, 15 November 2010

Digipak Analysis: Two

Continuing with my research of existing digipaks, in hopes of gaining more insight as to how I am going to construct my own I decided to look at The Distillers digipak for their album "Coral Fang". I decided to look at this because the digipak itself tells a kind of story and is fairly simple yet still stylised, offering a fairly interesting and controversial representation overall.


Friday, 12 November 2010

Digipak Analysis: One

As part of my research for my Digipak, I decided to look at and analyse the digipak created for the 2008 album "Intimacy" by Bloc Party, as the CD features similar ideas to some of those I am considering using in my own digipak for "I Don't Want To Fall In Love" by She Wants Revenge. Examples of the digipak can be seen alongside my analysis below.


Wednesday, 3 November 2010

Location Shots

I used two main locations in my video, these being the party scene in the living room and the bedroom scenes. The locations can be seen below in screenshots from my video.


As you can see, I created the bedroom scene so that not much of the room was seen, with the empahsis being on the bed. I scattered drinks bottles, cups and cans around the room to make it look lived in, and made sure it was dark outside while filming.


In the party scene I made sure it was dark, with low use of lighting. I wanted to give the impression of a crowded room and made sure that not very much furniture could be seen. Again I made sure that it was dark outside before filming here.

Tuesday, 2 November 2010

Filming Account

On the first day of filming I started by setting up the location,  placing empty bottles around the room, making sure everything was in place and making sure I had everything I needed to make filming run smoothly and without interruption.

Upon arrival of my two main performers I had them change into costume for filming, and I helped to do their hair/ apply their makeup and ease them into the process.

I first started filming with both performers doing all of the shots that required them on their own, using extreme close up for a lot of these shots. I did all of these scenes including a couple of the shots that required the pair to be filmed together by the end of the day.

On the second day I had the two performers come in again and repeated the process of hair/ makeup application, and then began to film the two as a pair by following my shot list/ storyboard. Filming went fairly successfully and I managed to film mostly all of the scenes that featured the two performers. I did however have to push back to date to film a large group of people and the two performers within this scene, as I was not able to get hold of enough people to make the scene work nicely.

I later had a group of people come to be filmed, as well as the two main performers, in which I filmed a party scene in which the pair would meet for the first time in the video, surrounded by others. I followed my shot list and storyboard, checking off any previously unfinished filming.